The following article originally appeared in The Comic Art Price Guide/Third Edition, by Jerry Weist, Ivy Press, 2011.
ORIGINAL COMIC ART AND PAINTING RESTORATION
By Brian Anthony
Twelve years ago I decided to turn my art restoration hobby into a business and began a serious study of the various restoration techniques available. I attended a week-long workshop hosted by an old friend and one of the very best restorationists in the business. On the first day, almost as an afterthought, he said, “You know, no two restorations are alike. They may appear the same from the outset, and on the surface may even appear identical, but you can do a thousand restorations and no two will ever be exactly the same”.
And now, over a decade and one-thousand five-hundred restorations later, I cannot think of a more absolute truism in the field of art restoration. So if every job is unique, what generalizations can be made?
Let’s consider three philosophical points;
1) Do no harm!
2) Do not overwork – the final artwork should never appear restored
3) Make any alternations or additions archivally sound.
There is a difference between an artist knowing his craft and creating a work of art, in contrast to a restorationist applying his craft to an existing piece of art. The restorationist must apply his techniques, which in broad strokes may include cleaning, repairing damage, replacing areas of loss, and recreating missing images, to the artwork while making the new additions appear seamlessly and organically as if part of the original. In one way the restorer’s job is easy, because it is almost always pre-determined what the end result should be. The difficult part is how to get there.
This makes restoration as a business extremely problematic. How do you accurately determine the time involved? Below are two extreme examples:
I once had to flatten and rebuild a hundred-plus year old toy box, which had a very ornate and beautiful lithograph label. While flattening the piece, a layer of the label‘s emulsion adhered to the hollytex material which protected the artwork from the metal plate of the hotpress (violating rule #1). The process I used had worked safely and effectively on over a hundred previous restorations, but this time around the label appeared ruined. After consideration I determined that the answer was to treat the removed layer as if it were a stencil, loosen it from the hollytex without actually removing it, thereby keeping it intact, placing a thin layer of animal glue on its exposed side, then carefully registering it back to the label on the box, and transferring it back with pressure from a bone-folder. The technique worked perfectly, but what had been agreed to as a two-hour job with the client ended up taking over ten hours, an eight-hour loss.
The second example, at the other end of the spectrum, involved a piece of original cartoon art from the 1920’s. The art was mounted on a heavily acidic piece of cardboard and was missing a large triangle-shaped piece of the image in the upper left corner. I first removed the backing, which came off easily enough, then planned to replace the missing portion of paper and recreate the missing art. I had a copy of the published piece and knew exactly what was graphically missing. But in removing the art from the backing I found that the “missing” portion of the page was still there, just cleanly folded behind itself. It simply needed to be unfolded, lightly pressed and then gently re-enforced from the back. I initially did not tell my client the true situation as I basked in hearing what a brilliant job I had done. But following the accolades I ‘fessed up, and he was delighted to learn that a restoration estimated at fifteen hours came in thirteen hours under.
Regarding my second point, an item should never be overworked and appear restored. In some cases a client will want a specific defect repaired and the work to be performed will be clearly defined. But if a piece of artwork needs more general restoration, the restorationist has to determine not only the optimum techniques to be used, but the degree in which to implement them. It’s an easy trap to begin matching color in a small area of art and, looking for the perfect place to end the blending between the new color and the original, to keep going, centimeter by centimeter… and at some point you’ll end up with a completely re-painted piece. Knowing where and when to stop is crucial and is something you develop a feel for over a period of years.
As far as making any restored work archivally sound, it seems an obvious thing to say. But restoration and preservation are very different things. When restoring artwork, while the goal is to make the art appear as close as possible to its original state, you are in truth making changes and additions to the original. If your goal was pure preservation, you would forgo these changes but would strive to keep the art in its current state, even if the art has suffered damage and deterioration. Restoration in itself may help preserve a piece (de-acidification will prolong the life of paper, for example), but then again, it may have no bearing on preservation at all).
Let’s take a couple of very different pieces of artwork and examine the restoration process from start to finish. We’ll begin with a page of black & white original comic art, vintage 1950’s, black ink on Strathmore paper, measuring 17” x 12”.
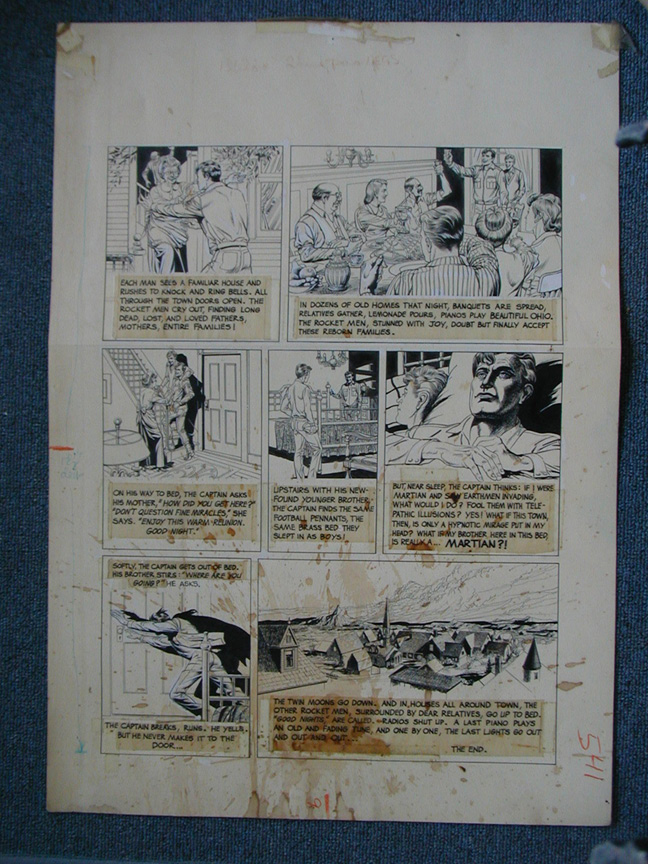
Let’s begin by assessing the problems. The page was crumpled at some time and had severe rust-brown water stains. The water had caused some of the ink to run. The paper had sustained small horizontal tears from the outside borders inwards though fortunately there was no paper loss. The paper was evidently hung at some point because there were tack holes in the corners. There was also some tape and tape residue, though fortunately only on the verso. The captions below the comic panels were add-ons made of a mylar-type material, and were somewhat shrunken and curled.
The first question would be to determine if the piece is worth restoring and if so, to what degree. What is its actual dollar value in its current state—or its sentimental value— versus the cost of restoration? Is it cost effective to restore—what will its value be after restoration? Some of these questions, especially those regarding the sentimental value of the piece, are highly subjective and can only be determined by the owner.
In determining the optimum techniques and materials to be used in a given restoration, the restorer begins with a series of tests. The ink is tested for fastness—if the ink were water-soluble, an aqueous wash to remove the stains would be out of the question. Fortunately, the ink that ran was on the text paste-ons, which needed to be removed anyway. The inked drawing was stable enough for washing.
Tape and residue removal involves solvents or skiving, which is physically scraping away the tape and residue. You always want to use the most benign technique that will get the job done, so tests are done beginning with the mildest solvent, progressively testing stronger ones until the desired results are achieved. The stronger solvents can also bleed inks, so the tests must be performed very conservatively. Often a combination of both skiving and a solvent will be used.
The paper is then tested for acidity. If the paper proves acidic you will need to introduce an alkaline agent to bring the paper to a neutral ph. This not only preserves the paper, keeping it from browning and becoming brittle over time, but also will make any paper or ink additions done in the restoration process blend more smoothly with the original art.
Once these tests are done I like to take a number of digital photos of the artwork prior to any restoration, with lots of close-up detail shots of the worst problem areas. These photos do more than just document the problems. They can be useful as references, in this case when re-attaching the mylar paste-ons, which will be de-tached from the original art.
Cleaning surface dirt from the artwork is generally the first step after the tests are finished and photos taken. But given that this particular page of artwork was badly creased and crumpled, a thorough cleaning at the outset was not the best approach. I mechanically cleaned what I could, working around the creases and damaged areas, with the intention of giving the art a second cleaning once the paper was flattened and stabilized.
The next step was to remove tape and tape residue. Fortunately both of these problems were only evident on the reverse of the piece, and a light bath in a mild solvent removed the tape. While still wet with solvent I skived away the residue. Sometimes tape leaves an embedded stain which has to be dealt with at a later stage. The mylar paste-ons were also removed at this time.
Given the fastness of the inks and the overall condition of the paper (specifically the stains and creases), I decided to wash the page. Tests showed that this would lighten or entirely remove much of the staining, and would make the creases more malleable in preparation of flattening. Washing is a very tricky process, as the paper is going to become more fragile and susceptible to damage when wet. It may want to continue to rip along any existing tears, and will potentially want to separate at the creases. I like to mount the art in a supporting grid and submerge it in a washing tray. Tap, distilled or mineral water, warm or cold, with or without additives, are all considerations. Photo-bleaching, which involves using ammonia additives and a filter to block the sun’s ultra-violet rays, can be used in conjunction with natural sunlight to lighten certain types of difficult stains. The length of time in the bath is another consideration. The ph of the paper was checked again and de-acidified while wet. I do not use commercial bleaches, no matter how diluted, as in time they will invariably do more harm than good.
Next the tank was drained and the artwork carefully blotted and allowed to dry. This is where the artwork is most susceptible to damage, and if not handled properly can tear, stick to the blotter, or dry irregularly, causing the paper to curl, become wavy, and create dirt tide marks. I used an oversized, ancient book press with just enough pressure to flatten the art and gently force out the moisture.
Following the last step, the artwork was still slightly damp and somewhat pliable. I then locally ironed the major creases and repaired the tack holes. Tack holes usually push paper through onto the reverse side rather than removing the paper entirely, so the torn fibers can be gently worked in from the back with a bone folder. The entire page was then pressed in a large heat press at a low temperature.
The small tears were then repaired and one fragile crease was reinforced from the back. The page was given another mechanical cleaning. The washing had loosened and floated out some dirt. I concentrated on the areas that were considered too fragile to work on in the first cleaning, and removed the balance of the surface dirt.
The rust stains had lightened up in the washing but were not altogether gone. I further lightened the stains with a series of translucent white washes until they all but disappeared.
The black ink was touched up as necessary, being careful to match the finish as well as the base color.
The paste-ons were then dampened from the back, taking care not to cause the ink to run, and flattened with a bone folder. The lettering was carefully touched up, and the paste-ons re-mounted with a stripe of glue on their left and right vertical ends.
The above step is a good example of knowing how far to take a process. About 80% of the curl and stipple came out the way I approached it. If I had wetted the mylar or placed it in a hot press it may have sustained irreversible damage. While there may not always a perfect answer, there is a best answer. You must always look for the best answer.
The page was now finished. I provided an acid-free cardboard backing for support . The final step was to discuss with my client his plans for the piece—framing, flat storage, etc.—and to offer any suggestions I might have, given the restored condition of the piece.
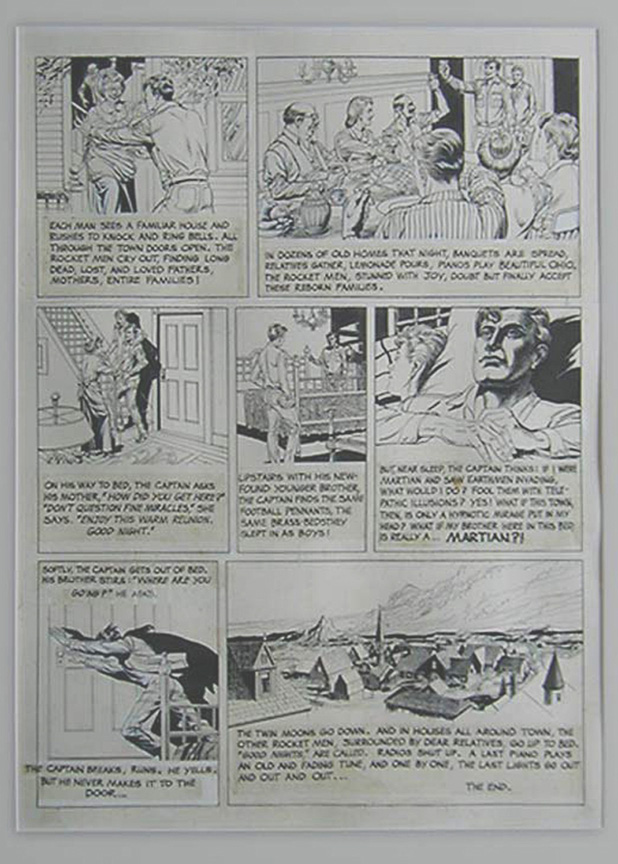
My client had the artwork restored for his friend, Ray Bradbury, and I had the honor and pleasure of delivering the piece to Ray at his home.
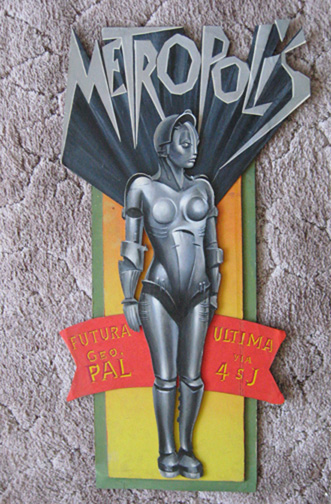
I have gone on at length discussing the above restoration, which was done in 2002, and could only locate the most extreme before-and-after photos. The second restoration we will discuss is an Albert Nuetzell painting of the Maria Robot from the film classic “Metropolis”.
In the event that I sound like a one-man band, I’d like to point out with pride that my wife, Kim, works alongside me on all of our restoration projects. And while we generally share responsibilities on each piece, the following painting was, for the record, one of her solo efforts.
The following overview benefits from having a number of photos showing in detail numerous steps in the restoration process. Given the lengths I have gone to in describing the comic art restoration, I will move more quickly through the painting, allowing the photos to speak for themselves.
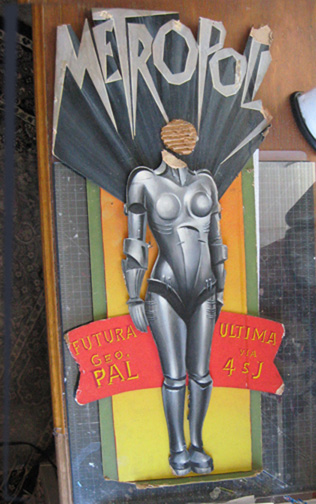
This striking piece was created by Nuetzell for his friend, Forrest J Ackerman, in the 1960’s. It is a dimensional painting, acrylic on four heavy layers of boards. The first and second layers were plain backgrounds, the second slightly smaller than the first to give the picture additional depth. The third layer consisted of the ornate upper title and the lower-placed scroll. The fourth and topmost layer was the robotrix itself.
The painting had surface dirt and was missing the lower corners of the bottom-most layer. There was significant loss to the top of the title in layer #3, and to the corners of the lower scrolls. The worst damage was to the Robotrix itself, which was missing her head from the neck up!
The painting was given a thorough mechanical cleaning, which brightened up the colors considerably. The next task was to determine what the missing graphics looked like. Fortunately, with a little research Kim found that Nuetzell’s lettering was based on an early “Metropolis” art-deco one-sheet. With this as her guide the missing pieces were drawn on light cardboard, which was cut out and fitted for size. After a couple of attempts and some tweaking, she had a perfect template of the missing areas. The template was transferred to a new, clean board that matched the thickness and general characteristics of the painting’s original board. The new pieces were cut and again fitted for size. Then the new area was trimmed and adjusted a bit at a time until it became a perfect fit. It was then lightly reinforced from the back, and the letter-lines were drawn in along the front, insuring that the graphics on the painting would continue seamlessly into the new areas. Only when this was done to her satisfaction did Kim go back and permanently attach and reinforce the new board to the original painting from the reverse.
The joins between the new and old areas were filled and pressed from the front with successive layers of a very fine Japanese mending tissue until the joins disappeared. Too much pressure would have damaged the layering, so great care had to be taken during this particular step.
To recreate Maria’s missing head we again did a bit of research and found both photos and posters of her in the exact pose as that in the painting. It is actually considered the iconic Maria pose. A sketch was made of the face on light cardboard and reworked and tweaked until it was perfect. The sketch/template was then transferred to an appropriate piece of board.
The head was attached using the same Japanese tissue and pressing method used on the lettering. All of the newly added areas were then prepped and painted. While the new head had a graphically ideal area to make the join to the original – at the neck – its colors, shading, and even the final texture of the finish had to be absolutely perfect.
On the right side of the orange layer there was a vertical line of glue. When the artist positioned the lettering layer onto the background, the artwork must have been upright, and the glue had dripped straight down. In restoration this is not considered a defect, it was original to the piece and thus was left as-is.
Following minor touch up, the Metropolis painting was finished, and Maria was on her way to her eager—and patient—owner.
When beginning restorationists ask my advice, I get the distinct impression that my answers somewhat disappoint them. I’ll usually make pragmatic suggestions, while they seem to be hoping I can impart some magical and mystical secrets. The truth is that there are no short cuts to the study, practice and experimentation necessary to excel in restoration.
Likewise there are no short cuts in learning to match colors, textures and finishes. What worked well for me was to marry a wonderful woman who had experience restoring paintings for a museum in Germany, and to put her in charge of our color work .
I hope this article provides some insight into the mysterious world of art restoration. Certainly it is often as nerve-wracking as it is rewarding. But there are perks. When my job gives me gray hairs my wife can paint ‘em out.
At the time of this writing Jerry Weist has just passed away at the age of sixty-one. Jerry was my friend for over thirty years. He had a beatific smile and a wonderful, goofy laugh. A more loyal, kind and generous friend I have never known. Jerry was one of a kind, an absolute original in the best sense of the word. Kim and I loved him and we will miss him. —Brian
A visit from Jerry was always an event. I would show him a small piece of artwork I had aquired and he would go wild! He was passionate about his family, his friends and his art. He always made me feel special and important, and that was just one of the wonderful qualities about him. He will live forever in our hearts. Love you, Jerry.—Kim
Back <<<